|
In this short tutorial I will be showing you how to quickly setup QuArK to compile and
run maps for the Doom 3 game engine. This is one of the easiest games to configure in QuArK.
Primarily because, unlike most other games, there are no build tools that you need to download
or setup to build a map with. These are already built right into the Doom 3 game engine itself.
In addition, just about every setting you need is already pre-set for you. So let's get to it!
Part 1 – Setting up QuArK to work with Doom 3
In this section we will quickly go over how to setup QuArK to work with Doom 3.
To start with load up QuArK, you should be greeted with the 'QuArK Explorer' panel.
The QuArK Explorer allows you to define which game environment you wish to work in,
as well as doing many other things.
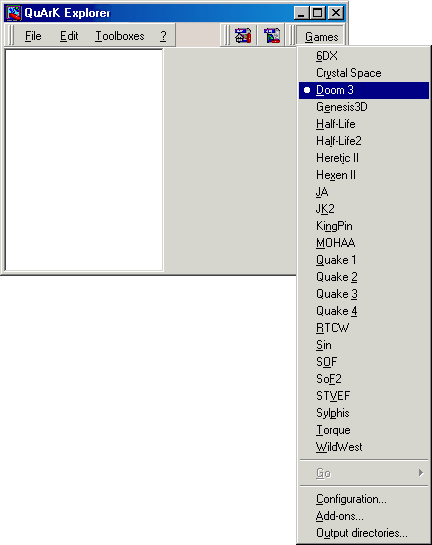
First we need to select the game we want to map for. We do this by simply going
to the 'Games' button located on the top right of the Explorer panel, once pressed it
will present you with a drop list of all the currently available games, select
Doom 3 as shown in the screen shot to the right.
Next we need to setup QuArK to work with the Doom 3 game engine, to do so go back to the
'Games' button and press the 'Configuration' button at the bottom of the list.
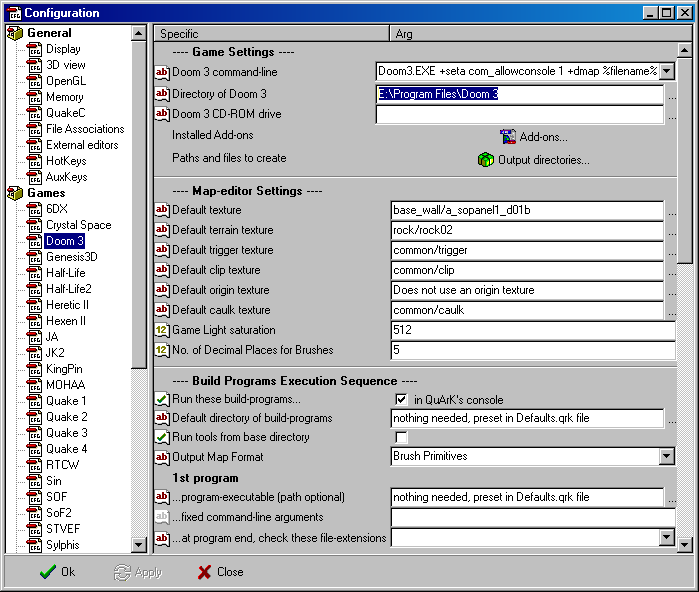
Once selected a new window will be opened called 'Configuration', making sure you have
Doom 3 selected on the left navigation panel, (under the Games Tab) as we now need
to fill out some of the necessary game settings on the right of the Configuration panel which
is shown in the next image just below.
|

|
As you can see in the image below, most of the settings have already been set with a default
entry. While others have been pre-coded in
QuArK's Defaults.qrk file that you can not see. This will prove to make life a lot easier
when you go to build and run your maps in Doom 3.
Doom 3 command-line : Even though this is pre-set for you, I wanted to explain
exactly what the added items are that follow the Doom3.EXE entry.
The "+seta com_allowconsole 1" lets you bring down the Game Console by pressing the ~ Tilde
key, instead of Ctrl+Alt+~ keys as you would normally have to do.
The "+dmap %filename%" is the command that is fed into the Doom 3 Game Console automatically to
build your map, %filename% is a variable that fills in the current map name you are editing.
And even though you can not see it, because it has been pre-coded in QuArK's Defaults.qrk
file, there is another command line entry of "+devmap (the map name)" that loads the compiled
map into the Doom 3 engine and runs it.
Directory of Doom 3 : This is the ONLY item that you really need to set.
If this does not match your location, use the ... button to select your Doom 3 folder.
After you have finished setting QuArK to work with the Doom 3 engine, simply press the 'OK'
button to close the Configuration panel. This will put you back in the QuArK Explorer. Now
is also a good time to close QuArK completely, as this will save your settings in the
Setup.qrk file. You're done!
|

|
Part 2 – Compiling
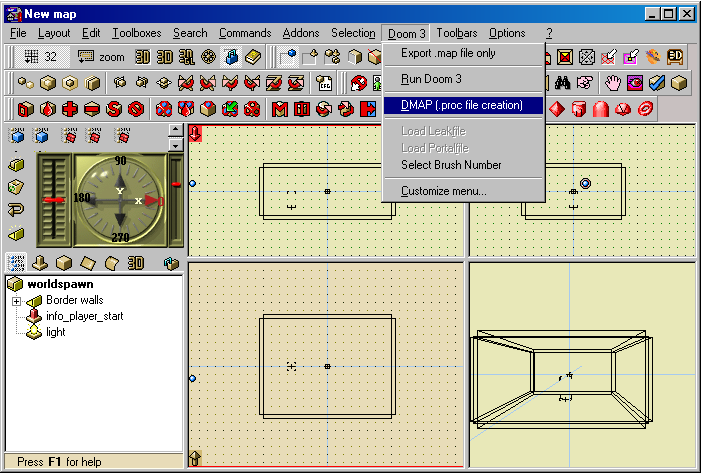
When you are ready to compile your map, simply select the "DMAP [.proc file creation]"
main menu item. This will cause QuArK to export the map file to your Doom 3\base\maps
folder. If the maps folder does not exist then QuArK will create it. Once that is done,
QuArK will then start Doom 3 up to complete the process of compiling the map file and
running it in Doom 3. All the compiled files will also be created in the maps folder.
It can't get much simpler then that!

|
|
Because you have already completed the configuration steps above you will be able to
see your map in QuArK's Textured 3D view. Even that part is automatically done for
you. Just place your mouse cursor over that view, click your RMB and select
"Textured" from the pop-up menu. The only other thing QuArK could do to make it easier,
would be to make the map for you. Just a few more minor but important pointers in the
Misc. Info. section
below and you're good to go.
|
|