Advanced stuff
Updated 05 Apr 2018
- QuArK Information Base
- 2. Map editing
- 2.1. Tutorial - Creating a map
|
|
Advanced stuff
Updated 05 Apr 2018
|
Upper levels: - QuArK Information Base - 2. Map editing - 2.1. Tutorial - Creating a map |
|
2.1.4. Advanced stuff |
[ - - ] |
This is the fourth and final part, which guides you through the methods and functions of creating a map in QuArK's map-editor. You should have read the first part, second part and third part before going through this fourth part. The advanced stuff is optional, but learning these can help you set up your maps faster than normal. |
|
Index |
|
Wall maker and Hollow maker |
Decker - 05 Apr 2018 | [ Top ] |
|
|
Group techniques |
Decker - 05 Apr 2018 | [ Top ] |
|
|
Creating holes (carving) using Diggers and Negative brushes |
Decker - 05 Apr 2018 | [ Top ] |
|
|
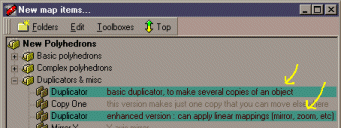
Creating copies using Duplicators, Copy-One and Mirrors |
Decker - 05 Apr 2018 | [ Top ] |
|
|
Face Sharing |
QuickDeath - 05 Apr 2018 | [ Top ] |
|
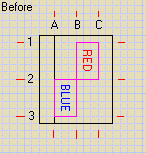
QuArK supports the advanced feature of "sharing" a face among several polyhedrons (NOTE: the term "polyhedron" and "brush" are interchangeable. Many editors use the term "brush" while QuArK uses "polyhedron" or simply "a poly"). Please note that face sharing requires the use of "groups". If you don't know how to use QuArK's group feature, you need to review the basics. Before we get into face sharing, we also need to review some Quake-engine basics. Defining a world... Quake-engine based games are comprised of polys. To define a poly, you need to define a number of planes. As we all remember from geometry, a plane is a flat, 2-dimensional object that has infinte length and width. A poly in Quake is the intersection of a bunch of planes. A simple cube is defined by the intersection of six planes. Two planes define the top and bottom of the cube while four more planes define the four sides. Imagine a house of cards. A single "room" of this house would consist of one card face down on the table, four cards for each side and one card on top. Now imagine these cards as planes. The inside of this "room" (the place where all six of the planes intersect) creates a poly. QuArK gives you individual access to the planes, or "faces", that define a poly. As we all know, you place textures on these faces to build your level. What you can also do is "share" a face among multiple polys. If two (or more) polys share the same face, you define the texture scaling and position once on that shared face and every poly using that face will have a smooth texture flow. Putting Face Sharing to work Imagine 3 polys in a row (part of a room). The middle one is the same height as the ones to the left and right, but its bottom is raised up. It's an entry way into a hallway. Here's the view if you're facing the 3 walls: 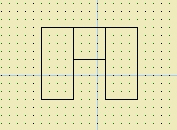 Assume we use the same texture for the "front" of these polys (the side that is facing us), we'll have to position the texture on the second and third polys very carefully so it flows nicely across the entire wall. Looking at the 3 polys from above, we'd see:  All 3 of these polys share 2 planes. If we look at the above view the "front" and "back" faces of all 3 polys run along the same plane: 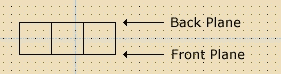 To keep things simple, we'll just worry about the "front" plane. Create a new group. We'll call the group "Wall1" and move all 3 polys into the group. Your treeview should look something like this: 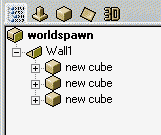 Now open up the first poly to show all of the faces and move the "front" face to the top of the group (determing the face to move is easiest by just selecting it in the editor). You move the face by grabbing it with a right-click and dragging it to the top of the group (outside the poly). We'll assume the face to move is the one QuArK calls "south". After moving the "south" face, your treeview should now look something like this: 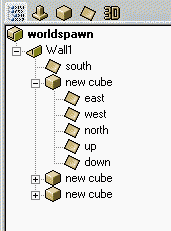 Now open up the face list of the second and third poly's and delete the front face of each of those -- this will usually be the same face (i.e. "south") as the first one, but not always. Select the face in the editor to be sure. The "south" face is now the "front" face that all of the three polys share. Define your texture for that face and you're all set! No problems with texture alignment because it's one face -- the texture is just pasted across the entire face! 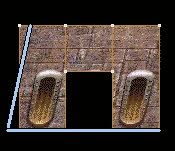 This technique is also handy if you have a floor that is composed of multiple polys (because of the shape of the room -- non-convex). Assuming all of these polys are at the same height, put all of them in a group and share the side facing "up". Now when you want change the floor texture, change it on the one floor face and the entire floor (across all of the polys) changes since they're all sharing that face (plane). |
|
Copyright (c) 2022, GNU General Public License by The QuArK (Quake Army Knife) Community - https://quark.sourceforge.io/ |
[ - Top - ] |
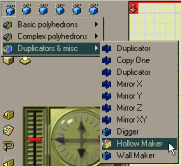 If you don't want to waste time, making rooms by the brick-by-brick method
(e.q. create a brush per wall/floor/ceiling), you should try out the two
macro-objects; Wall Maker and Hollow Maker.
If you don't want to waste time, making rooms by the brick-by-brick method
(e.q. create a brush per wall/floor/ceiling), you should try out the two
macro-objects; Wall Maker and Hollow Maker.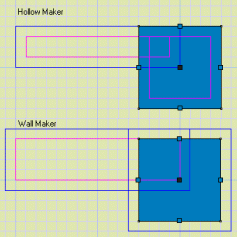 Both the Wall maker and Hollow maker, consists of solid-cube(s) and
negative-cube(s), but you only have to think about moving one.
Both the Wall maker and Hollow maker, consists of solid-cube(s) and
negative-cube(s), but you only have to think about moving one.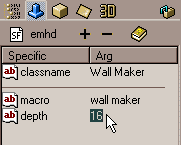 The size of the walls are determined by the specific depth , which can
be found in both objects. To increase the thickness of the walls, increase the
value of depth.
The size of the walls are determined by the specific depth , which can
be found in both objects. To increase the thickness of the walls, increase the
value of depth. If you plan on using anyone of the below mentioned macro-objects; Digger,
Negative brush, Duplicator, Copy-One or Mirror, you must use groups!
If you plan on using anyone of the below mentioned macro-objects; Digger,
Negative brush, Duplicator, Copy-One or Mirror, you must use groups!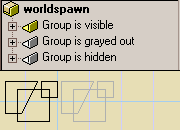 With groups, you can also hide their contents from the 2D-views, or just gray
it out. To do this, select the group in the tree-view, right-click to get its
context-menu up, and select between:
With groups, you can also hide their contents from the 2D-views, or just gray
it out. To do this, select the group in the tree-view, right-click to get its
context-menu up, and select between: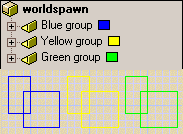 You can also give a group a color to illustrate different things. Again in the
context-menu you can choose the Group color, which will bring up
a color-choice dialog.
You can also give a group a color to illustrate different things. Again in the
context-menu you can choose the Group color, which will bring up
a color-choice dialog.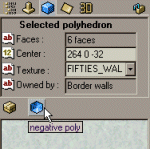 If you think, that to create a hole in a brush, you have to brush-subtract
(carve), then think again when using QuArK!
If you think, that to create a hole in a brush, you have to brush-subtract
(carve), then think again when using QuArK! There are no actual difference between a digger macro and a negative poly,
other than in the tree-view you can see the Digger object. You can't see a
negative poly, unless you rename it by selected it in the tree-view, and press
the F2 key.
There are no actual difference between a digger macro and a negative poly,
other than in the tree-view you can see the Digger object. You can't see a
negative poly, unless you rename it by selected it in the tree-view, and press
the F2 key.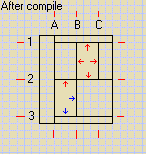
 The texture of a face on a digger or negative poly, will be applied to the
brush that is carved, but only if that brush hasn't already been carved
or cut at that coplanar plane that the face of the digger/negative poly will
carve/cut it at. This can get tricky at times, and depends on which
digger/negative poly does the first carving/cut.
The texture of a face on a digger or negative poly, will be applied to the
brush that is carved, but only if that brush hasn't already been carved
or cut at that coplanar plane that the face of the digger/negative poly will
carve/cut it at. This can get tricky at times, and depends on which
digger/negative poly does the first carving/cut.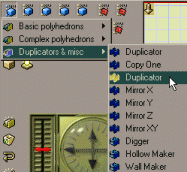 Say you wanted to make a staircase, with 20+ stairsteps. The dull method is to
create a brush which is the first step, and then copy-paste-move it so you'll
end up with 20+ brushes. Now imagine that you made an error, or found a new
texture that'll look better - you would have to start all over.
Say you wanted to make a staircase, with 20+ stairsteps. The dull method is to
create a brush which is the first step, and then copy-paste-move it so you'll
end up with 20+ brushes. Now imagine that you made an error, or found a new
texture that'll look better - you would have to start all over.