|
In this short tutorial I will be showing you how to quickly setup QuArK to compile and
run maps for the StarTrek Voyager Elite Force or STVEF game engine. This particular games
configuration is a bit more involved than most because it actually deals with two different
compiler programs. Because of this, we have strived to preset as much of this as possible
and even have included one of the compiling programs and its related files in its own folder
located in the RTCW addons folder. But I will cover that in more detail a little bit later.
Part 1 – Setting up QuArK to work with STVEF
In this section we will quickly go over how to setup QuArK to work with STVEF.
To start with load up QuArK, you should be greeted with the 'QuArK Explorer' panel.
The QuArK Explorer allows you to define which game environment you wish to work in,
as well as doing many other things.
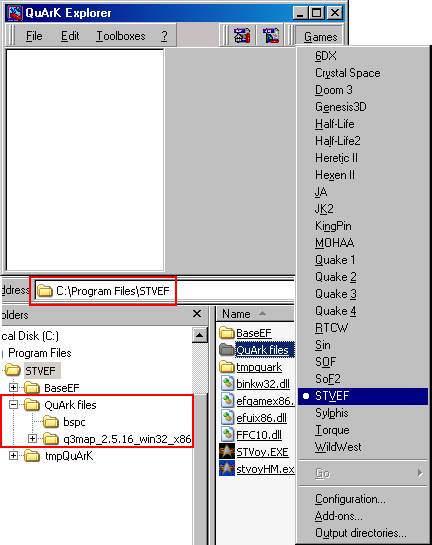
First we need to select the game we want to map for. We do this by simply going
to the 'Games' button located on the top right of the Explorer panel, once pressed it
will present you with a drop list of all the currently available games, select
STVEF as shown in the screen shot to the right.
Next we need to setup QuArK to work with the STVEF game engine, which is actually a variation
of the Quake 3 engine. To do so go back to the 'Games' button and press the 'Configuration'
button at the bottom of the list.
Once selected a new window will be opened called 'Configuration', making sure you have
STVEF selected on the left navigation panel, (under the Games Tab) as we now need
to fill out some of the necessary game settings on the right of the Configuration panel which
is shown in the configuration image further down.
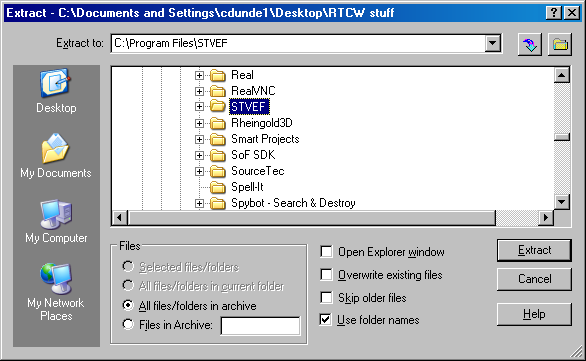
But before we do that, go to your QuArK > addons > RTCW folder, copy the QuArK files
folder that is there and paste it into your StarTrek Voyager Elite Force game folder
as shown to the right here. In the QuArK files folder is a sub-folder called bspc.
In that folder is one of the compiling programs I spoke about briefly above and its related
files.
The other folder shown below that is the second compiling program folder and
its files. You will need to download the q3map_2.5.16_win32_x86.zip
file from the Official QuArK site.
Also, see the Misc. Info.
section below for more detailed instructions on its installation.
|
|
Part 2 – QuArK game pack download
This is the QuArK STVEF game support package. Download the QuArK_STVEF.zip
file and extract it, using the folders path option, to the game folder location where you have STVEF installed on your computer.
All the paths to the "BaseEF" sub-folder have already been set in the zip file.
The zip file is about 27.6 MB and will take around 1 minute with cable or DSL.
This package has been created to work with QuArK 6.5.0 Beta 1 or later and will give the most complete
support available.
Every effort has been made working through the STVEF game files and other sources to allow the viewing
of all available textures in QuArK's Texture Browser,
all game models viewable in the 3D editor Texture views and detail entity settings with the use of
pre-defined dropdown list, model selection and variations list, file selection capabilities for models
and sounds, as well as 'color pickers' for all lighting functions. Even a few 'script\shader' corrections.
|
|
Part 3 – QuArK STVEF Configuration settings
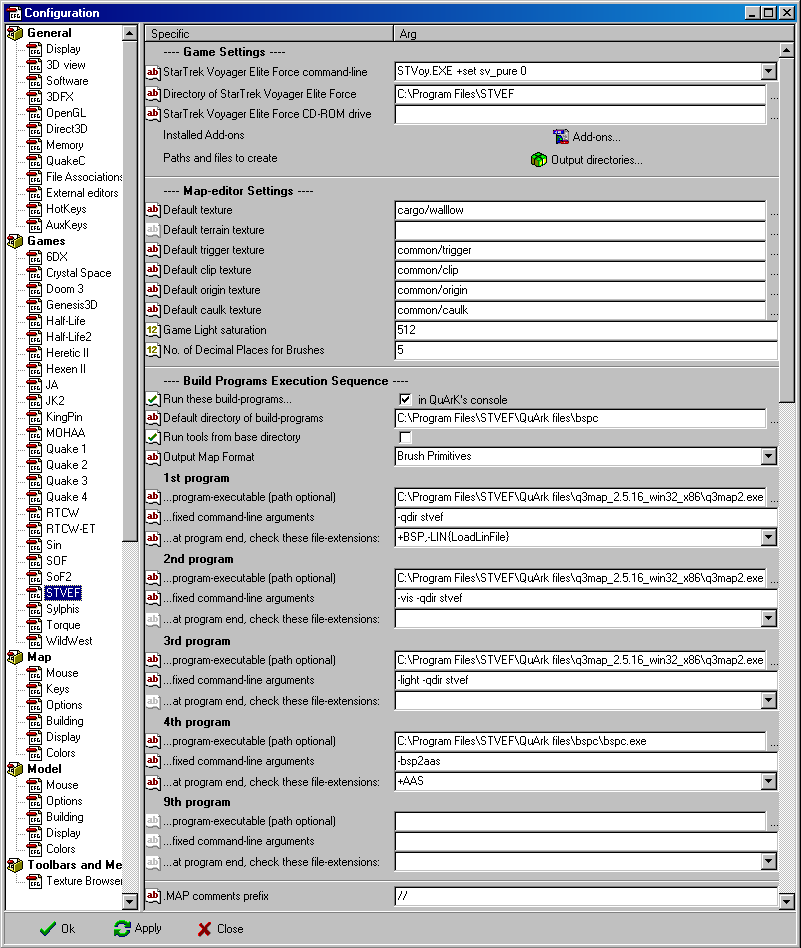
As you can see in the image below, most of the settings have already been set with a default
entry. While others have been pre-coded in
QuArK's Defaults.qrk file that you can not see. This will prove to make life a lot easyer
when you go to build and run your maps in STVEF.
STVEF command-line : Even though this is pre-set for you, I wanted to explain
exactly what the added item is that follows the STVoy.EXE entry, the entire line is:
STVoy.EXE +set sv_pure 0
- (two spaces)+set sv_pure 0 lets you use the game console (by pressing the ~ Tilde key)
developer commands like /noclip, /god and /give all.
Directory of STVEF : If this does not match your STVEF folder location, use the ... button to select your STVEF folder.
STVEF CD_ROM drive : This is the location of the game cd if you need to operate it from there, just click on the ... button to select the cd drive.
Run these build-programs... : This allows the display of the building, compiling, process in QuArK's console.
Default directory of build-programs : Because there are actually two programs involved for compiling, we use this path for the first one, the bspc tool location.
Run tools from base directory : Do not check this box unless you plan to put both build programs in the same folder and set its folder path above.
Output Map Format : The default setting for "Brush Primitives" should be correct here. If not there are other options you can choose from or just type in your own.
1st through 3rd program : This are pretty self explanatory, just make sure the "q3map2.exe" is set to the correct path for you. If not just use the ... button to select the file.
|
|
4th program : Again, self explanatory, just make sure the "BSPC.EXE" path is set correctly, which was done above for the Default directory of build-programs .
After you have finished setting QuArK to work with the STVEF engine, simply hit the 'Apply'
button, and then press the 'OK' button to close the Configuration panel. This will put you
back in the QuArK Explorer. Now is also a good time to close QuArK completely, this will
save your settings in the Setup.qrk file. You're done!
Part 4 – Compiling
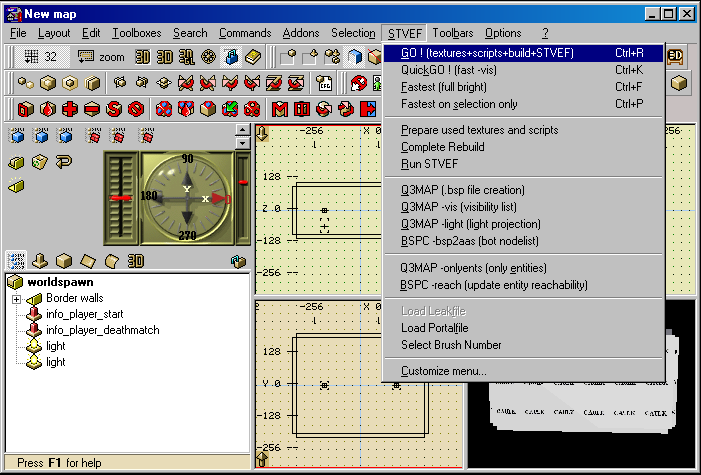
When you are ready to compile your map, simply select the "Go ![textures+scripts+build+STVEF]"
main menu item, which is a "Full" build, meaning for, textures, their script files, AAS files (for bots)
and lighting. This will cause QuArK to export the map file to your STVEF\tmpQuArK\maps
folder, texture files to the textures folder and script files to the scripts folder. If any of the
folders do not exist then QuArK will create them. Once that is done, QuArK will then start up the two
building programs to complete the process of compiling the map file and build the rest
of the files needed to run in STVEF using the files in these folders.
Then the game will be started to load your map and display it !
|
The rest of the STVEF menu items are variations of the "Full" build process to expedite the compiling
and in game viewing time when a "Full" build is not needed.
Because you have already completed the configuration steps above you will be able to see
your map in QuArK's Textured 3D view. Even that part is automatically done for you. Just
place your mouse cursor over that view, click your RMB and select "Textured" from
the pop-up menu. Just a few more minor but important pointers in the
Misc. Info.
section below and you're good to go.
|
|