
Torque
Updated 04 Oct 2019
- QuArK Information Base
- 1. Introduction to QuArK
- 1.3. Configuration and Options
- 1.3.2. Games
- 1.3.2.1. Specific games
|
|
Torque
Updated 04 Oct 2019
|
Upper levels: - QuArK Information Base - 1. Introduction to QuArK - 1.3. Configuration and Options - 1.3.2. Games - 1.3.2.1. Specific games |
|
1.3.2.1.8. Torque |
[ - - ] |
|
Index |
|
Configuration |
cdunde - 04 Oct 2019 | [ Top ] |
|
In this short tutorial I will be showing you how to quickly setup QuArK to compile maps for the Torque game engine. To create maps for Torque you must download a version of its build tool, the map2dif_DEBUG.exe file. There are a number of different versions available on the Internet, but I recommend using the 0.900r-beta version. 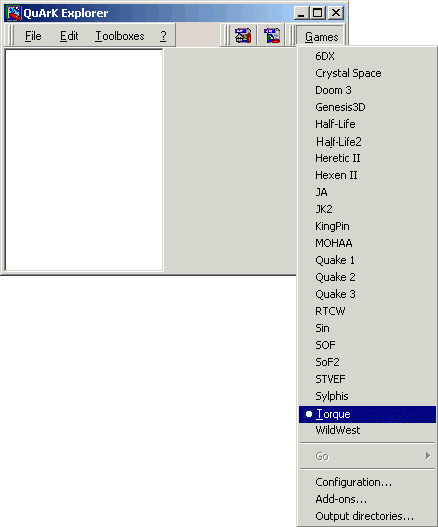 To keep things organized it is best to create a new folder in your Torque directory called "QuArK files" and place the file there. As you acquire other versions to try out you can place them in this same folder location as long as you change the file name to something that will not match any that are already there, to keep from over writing them. The name does not matter, the file will still work. Adding the version number or particular project name you use it with is the best way to help identify which one you want to use. You can change which one you want to use at any time.
Part 1 – Setting up QuArK to work with Torque In this section we will quickly go over how to setup QuArK to work with Torque. To start with load up QuArK, you should be greeted with the 'QuArK Explorer' panel. The QuArK Explorer allows you to define which game environment you wish to work in, as well as doing many other things. First we need to select the game we want to map for. We do this by simply going to the 'Games' button located on the top right of the Explorer panel, once pressed it will present you with a drop list of all the currently available games, select Torque as shown in the screen shot to the right. Next we need to setup QuArK to work with the Torque compiler, to do so go back to the 'Games' button and press the 'Configuration' button at the bottom of the list. Once selected a new window will be opened called 'Configuration', making sure you have Torque selected on the left navigation panel, (under the Games Tab) as we now need to fill out some of the necessary game settings on the right of the Configuration panel which is shown in the next image just below. 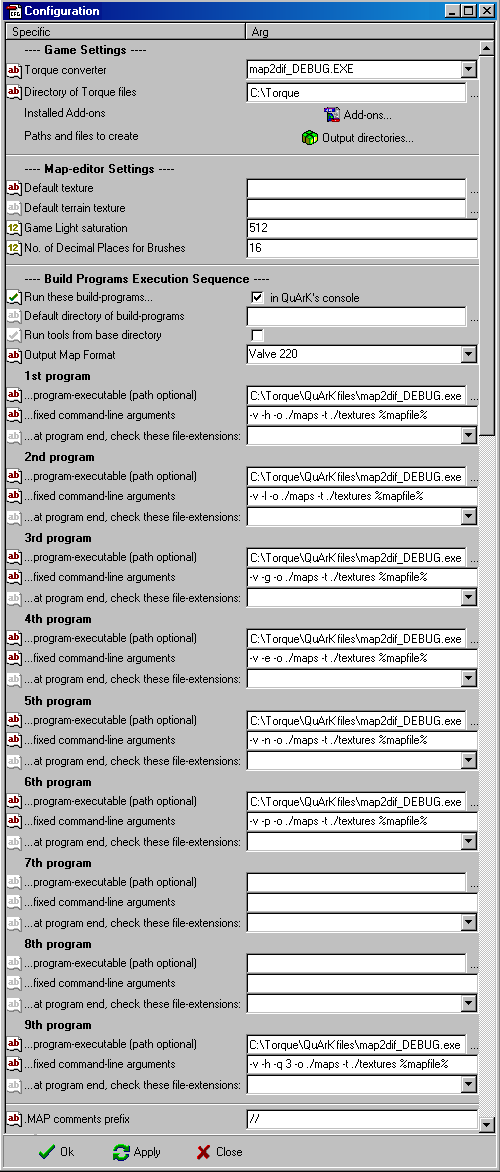 As you can see in the image to the right, most of the settings have already been set with a default entry.
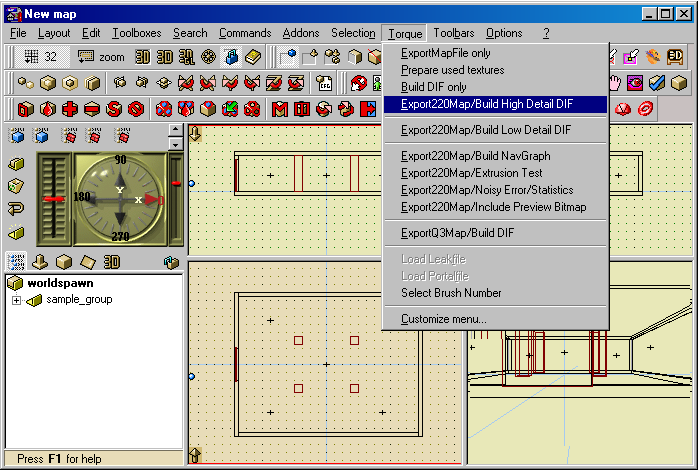
Torque converter : This is a single drop down item. But you can type in any file name for other versions. Directory of Torque files : If this does not match your location, use the ... button to select your Torque folder. Installed Add-ons : Use this button to register (add) your custom addon .qrk files, which is covered more in the Custom Textures section below. Paths and files to create : This is where QuArK will create a tmpQuArK folder, in your main Torque folder, to place your textures, map and dif files. Default texture (terrain texture) : These have no settings because Torque is an engine only so you need to create your own and select them here. Or you can download a package we have created. See Custom Textures below. Game Light saturation : Currently only for the OpenGL viewer. Larger values make darker scenes. No. of Decimal Places for Brushes : Fewer errors are encountered with the map2dif converter when this is set to 8 or above. Run these build-programs... : Leave checked. This shows the building of the dif file in QuArK's console. Default directory of build-programs : and Run these build-programs... : These can remain blank because the map2dif path is specified in the settings below. Output Map Format : This MUST be set to "Valve 220" or the dif file will not be created. Only the map file will. 1st thru 6th and 9th program : Only the "...program-executable (path optional)" lines need to be change using the ... button. Navigate to where you have put the map2dif file you wish to use and select it. Once the 1st program is set then the rest will open to that same folder. After you have finished setting QuArK to work with the Torque compiler, simply hit the 'Apply' button, and then press the 'OK' button to Part 2 – Compiling When you are ready to compile your map and make the dif file, simply select the "Torque" main menu item and then one of the build functions from its sub-menu. Using either the "Export220Map/Build High Detail DIF" or the " "...Low Detail DIF" will cause QuArK to create the tmpQuArK folder in your main Torque directory. QuArK will also create two sub-folders as well, the maps and textures folders within the tmpQuArK folder. The maps folder will contain the map and dif files and the textures folder will contain all of the textures that are currently used in your map. Usually the textures and the dif file need to be placed in the same folder when you go to load the dif file into Torque for placement in its editor.
|
|
Custom Textures |
cdunde - 05 Apr 2018 | [ Top ] |
| |
|
|
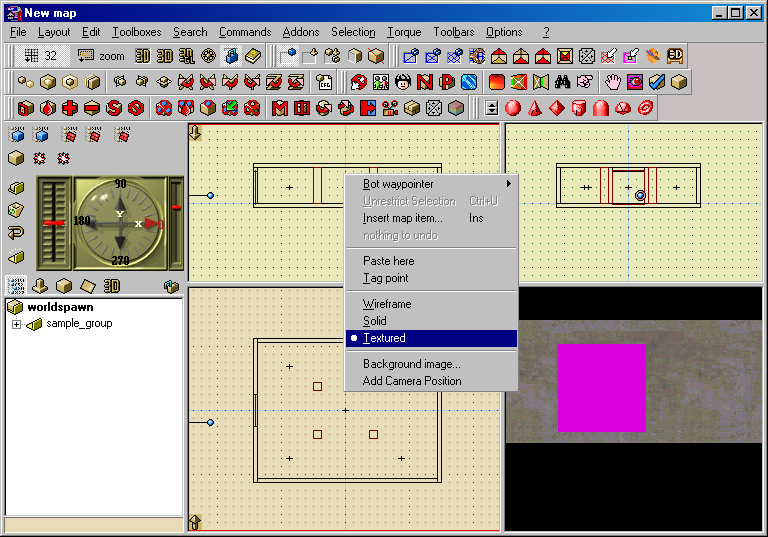
Once you have accomplished this last step you can then select the 3D Textured view, as shown in the screen shot above, by holding your mouse cursor over the 3D view, clicking your RMB and selecting the Textured item on the popup menu. QuArK creates a default building structure when you start a "New Map" from its Explorer's Games menu. But you may need to replace its default textures with ones that you now have in the Texture Browser to be able to see it in the 3D Textured view.
You can also now compile your map by selecting one of the functions from the main Torque menu as covered in Part 2 of the Configuration section above. Just a few more needed points about textures for Torque. 1) Most of the time they need to be of equal height and width and of a power of 2 (i.e. 16x16, 32x32, 64x128, 128x128, 128x256, 512x512, etc.). If not, then you will only see your map structures as white objects in the Torque Editor when you apply lighting to display the items. 2) It is necessary that the .dif and its textures are placed in the same location, or folder, in order to display the object with its texture. So, as covered above, these files are located in their respective map and textures folders of the tmpQuArK folder in your Torque directory and need to be moved to the proper location for their use in the Torque Editor. See your Torque documentation for that exact handling. |
|
Misc. Info. |
cdunde - 04 Oct 2019 | [ Top ] |
|
There is really nothing you need to change, but it is a good way to learn how these effect what steps QuArK is being instructed to perform. You will also notice that it displays the Program version and Built date so that you know exactly what version you are currently running. |
|
Copyright (c) 2022, GNU General Public License by The QuArK (Quake Army Knife) Community - https://quark.sourceforge.io/ |
[ - Top - ] |
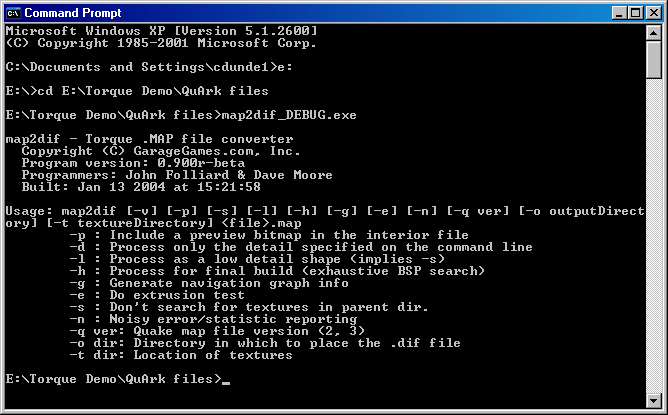 Command-line arguments
If you used the DOS Command Prompt to run the map2dif_DEBUG.exe file you would see the settings that are used in the "...fixed command-line arguments" for each program setting above in the
Command-line arguments
If you used the DOS Command Prompt to run the map2dif_DEBUG.exe file you would see the settings that are used in the "...fixed command-line arguments" for each program setting above in the