Go to QuArK Web Site
Object modes tool-palette
Updated 05 Apr 2018
Upper levels:
QuArK Information Base
1. Introduction to QuArK
1.4. Map-editor in QuArK
1.4.4. Tool-palettes

 1.4.4.4. Object modes tool-palette

 [ Prev - Up - Next ] 


 Index


 Overview

cdunde - 05 Apr 2018   [ Top ] 
With the QuArK Quick Object Makers an abundance of 3D object shapes can be created by simply choosing one of the toolbar object buttons and, while holding down the LMB, dragging the cursor around within any 2D view. Any of these objects can easily be created as a solid poly or a group of polys to make it a hollow structure. In the image below you can see just some of these shapes.
The top row shows a simple (minimum amount of faces) shape for the Sphere, Pyramid\Cone and Cylinder objects.
The second rows shows these same objects as more complex objects (more faces used).
The third row shows simple, complex and more complex objects of the Torus maker.

 Object Dialog Input

cdunde - 05 Apr 2018   [ Top ] 

Pressing this button, will open a dialog input box for the Object modes Toolbar item currently in use.

Not all objects will use the same dialog input box. Which ever object button is active at the time this button is clicked, will produce that objects dialog input box.
These dialogs will remain open until they are closed manually. They can also be moved around, resized and will save their settings, which are still active while closed, when QuArK is exited.

If a particular object has its own dialog then that objects name will appear in the title. Other wise the standard Object Distortion Dialog will be used for all other objects.
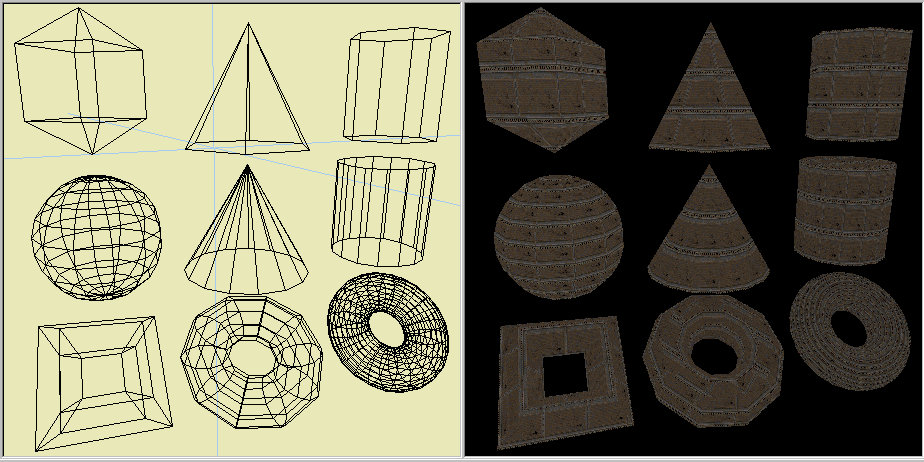
You can have one or more 'Dialog boxes'. open and active at a time. But they will only effect the objects that use them.


 Sphere

cdunde - 05 Apr 2018   [ Top ] 

Quick sphere maker: After you click this button, you can draw spheres on the map with the left mouse button and each sphere will be turned into an actual poly.

Move the mouse forward to add more faces, backwards for fewer faces, right to make it larger and left to make it smaller.
NOTE: Less than 3 faces will not draw anything.
Over 20 faces will 'freeze' QuArK but it will return.

Because the Sphere object is a far more complicated item to compute, creating it will take longer then the other objects as the number of faces it is given increases. Although it can 'freeze' the program for a period of time for processing, it will return the object and become active again. When making the Sphere hollow, built in alert messages will be displayed when specific plat toes are reached to make the user aware of the processing time that will be involved to create it and give them the option to continue or cancel this object all together.

Increasing the amount of its Object Distortion Dialog  will increase its height, making it more elongated.
Using a negative amount will make it wider or more oblong.


 Pyramid\Cone

cdunde - 05 Apr 2018   [ Top ] 

Quick pyramid-cone maker: After you click this button, you can draw pyramids-cones on the map with the LMB and each object will be turned into an actual poly.

The more sides that are added the more it becomes a cone shape.
Move the mouse forward to add more faces, backwards for fewer faces, right to make it larger and left to make it smaller.
NOTE: Less than 3 faces will not draw anything.

Once the object has been created you might have to use the special vertex movement function to stretch or reduce its size by dragging its top point common vertex. To use this function simply hold down the ' n ' HotKey when you select, drag and release the LMB.

For some reason, you only need to do this the first time the common vertex is dragged. Afterwards the vertex can be moved correctly, without using the special function, in the normal manner of just holding the cursor over the vertex, pressing the LMB and dragging it. Using the special function above without actually dragging the vertex will also create the same results.

Increasing the amount of its Object Distortion Dialog  will increase its height.
Giving a negative amount will make it shorter.


 Double-Cone

cdunde - 05 Apr 2018   [ Top ] 

Quick double-cone maker: After you click this button, you can draw double-cones on the map with the LMB. Each double-cone will be turned into an actual poly.

The more sides that are added the more it becomes a double-cone shape.
Move the mouse forward to add more faces, backwards for fewer faces, right to make it larger and left to make it smaller.
NOTE: Less than 3 faces will not draw anything.

Increasing the amount of its Object Distortion Dialog  will increase its height.
Giving a negative amount will make it shorter.


 Cylinder

cdunde - 05 Apr 2018   [ Top ] 

Quick cylinder maker: Clicking this button allows you to draw cylinders on the map with the left mouse button and each cylinder will be turned into an actual poly.

This can make angled sides or a more curved style cylinder by adding more faces.
Move the mouse forward to add more faces, backwards for fewer faces, right to make it larger and left to make it smaller.
NOTE: Less than 3 faces will not draw anything.

Increasing the amount of its Object Distortion Dialog  will increase its height.
Giving a negative amount will make it shorter.


 Dome

cdunde - 05 Apr 2018   [ Top ] 

Quick dome maker: Clicking this button allows you to draw domes on the map with the LMB and each dome will be turned into an actual poly.

Move the mouse forward to add more faces, backwards for fewer faces, right to make it larger and left to make it smaller.
NOTE: Less than 3 faces will not draw anything.

The amount of its Object Distortion Dialog  will be the number of sections to create the top, dome, curved part.
This can make angled sides or a more curved style dome by adding more sections.
As the mouse is dragged more downward, the sides become more flared outwards.


 Fan

cdunde - 05 Apr 2018   [ Top ] 

Quick fan maker: Clicking this button allows you to draw fans on the map with the left mouse button and each fan will be turned into an actual poly.

Move the mouse forward to add more faces, backwards for fewer faces, right to make it larger and left to make it smaller.
NOTE: Less than 3 faces will not draw anything.

Increasing the amount of its Object Distortion Dialog  will increase its height.


 Torus

cdunde - 05 Apr 2018   [ Top ] 

Quick torus maker: After you click this button, you can draw a torus group on the map with the left mouse button and each torus will be turned into a group of polys.

Move the mouse forward to add more faces, backwards for fewer faces, right to make it larger and left to make it smaller.
NOTE: Less than 3 faces will not draw anything. Because a torus is made up of a number of convex polys they will be placed into a group folder.

This particular object maker has its own Dialog Input Box because of the many different shapes that can be obtained when using a torus object.


 Dialog boxes

cdunde - 05 Apr 2018   [ Top ] 

At this time there are two dialog input boxes for the QuArK Quick Object Makers Toolbar that are linked to the Object Dialog Input button.
When an Object Makers Toolbar button is selected and this dialog button is clicked, the proper dialog box for that object maker will open.
All amounts that are set for any dialog box will still be active even if that dialog box is closed.
All of their settings will also be saved when QuArK is closed and remain the same when QuArK is reused.
All dialog boxes can be moved, resized and will remain open until manually closed.
Both dialog boxes can remain open at the same time and are active on the particular object makers that they relate to.

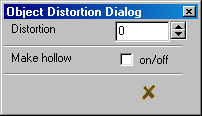
Object Distortion Dialog: This is a basic dialog input box that is used by every object maker on the toolbar unless a specific one has been created for that particular object maker.
   Distortion:
      Clicking on the 'up' arrow will cause the object to be stretched, or elongated, from its normal shape. Clicking on the 'down' arrow will do the opposite and cause it to shrink or be squished. If set to '0', then it will have no effect and the object will be crated to its normal default shape. It has no effect on how many 'rings', sections, or faces that an object will have. That is done by the actual dragging process or a 'custom' dialog box possibly.
   Make hollow:
      This check box can be used on any object and is pretty much self explanatory. Leaving this box unchecked will create the object as a normal solid item. For alternative ways of making a solid object hollow, see 'Misc. Info' below in the 'Visual Aids & Misc. Info' section. In addition, this function is effect by the Movement tool-palette and it is recommended that a low 'negative' setting be given for its Inflate/Deflate amount.
Clicking the 'X' will close any dialog box.
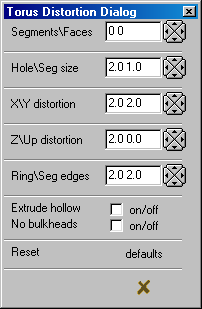
Torus Distortion Dialog: This is a custom dialog input box that only relates to and effects the torus object maker. The basic dialog box, covered above, has no effect on the torus object. Many shapes can be created from a torus using one or more of these input items.
   Segments\Faces:
      Segments - using the left and right arrows will add or reduce that number of sections or 'rings' that a torus would normally have.
      Faces - using the up and down arrows will add or reduce that number of faces per section that a torus would normally contain.
   Hole\Seg size:
      Hole size - using the left and right arrows will increase or reduce the radius of a torus, making its 'hole' larger or smaller.
      Seg size - using the up and down arrows will add or reduce the radius for the sections of the torus, making it taller or shorter.
   X\Y distortion:
      X distortion - using the left and right arrows will increase or reduce the length of a torus, causing it to become oblong on the X axis.
      Y distortion - using the up and down arrows will increase or reduce the width of the torus, causing it to become oblong on the Y axis.
   Z\Up distortion:
      Z distortion - using the left and right arrows will increase or reduce the height of a torus, causing it to become taller or shorter on the Z axis.
      Up distortion - using the up and down arrows will actually 'stretch' and taper the torus, causing it to become more of a hollow 'tube' on the Z axis.
   Ring\Seg edges:
      Ring edges - using the left and right arrows will cause the edges of the 'rings' of a torus to become angled or squared off, creating more of an overall 'box' shape.
      Seg edges - using the up and down arrows will cause the edges of the 'segments' of a torus to become angled or squared off, giving it more of a 'hallway' shape.
      Both of these powerful functions can render some very unusual results and shapes that add just 'gobs' of real creativity, experimentation and fun to this object.
   Extrude hollow:
      This check box can be used at any time and is pretty much self explanatory. Leaving this box unchecked will create the object as a normal torus item. For alternative ways of making a solid object hollow, see 'Misc. Info' below in the 'Visual Aids & Misc. Info' section. In addition, this function is effect by the Movement tool-palette and it is recommended that a low 'negative' setting be given for its Inflate/Deflate amount.
   No bulkheads:
      This check box is a special feature item for the torus object only and its use is controlled automatically by the 'Extrude hollow' check box above, which has to be active for this one to be checked. This function will cause all interior 'bulkhead' walls to be removed when the torus is made hollow.
   Reset & the X buttons:
      Reset button - this one 'defaults' button, as it is marked, will reset all of the default values for this dialog box.
      X button - this will of course close the dialog box with its current settings. Even though it may be closed, these settings are still active.
As some general notes:
All of the input amounts can also be done manually and will take multipal decimal place input as well, except the first set for 'Segments\Faces'.
Also, there have been some built in safe gards such as not allowing some to go below zero or pass another that can cause a torus to break up.
Another safe guard that has been added is the removal of any broken polys during the dragging process when very abstract shapes are being created.
So basicly, 'what you see is what you get'.

 Visual Aids & Misc. Info

cdunde - 05 Apr 2018   [ Top ] 
Visual Aids:
Applying to all of the QuArK Quick Object Makers, a number of visual aids have been added to enhance their features. These are covered below in relation to the screen shot also shown below. As a general statement, all objects shapes and changes are shown during the entire dragging process in all of the 2D and 3D views as redline objects. Once this process is completed they are 'dropped' into these views as full polys, or groups of ploys in their own folder, and with the 'Default' mapping texture applied. In some cases, their sections and/or faces will be labeled for easy individual identification.
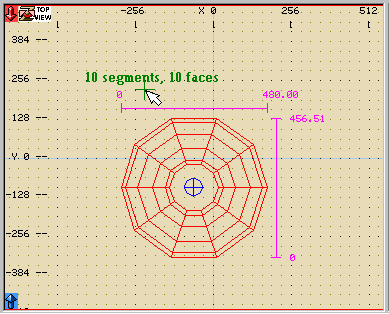
Ruler guide in 2D views:  This function has been incorporated to show dimensions as a drag is taking place and upon its completion as well. The 'Rulers' are fully dependent on their normal view function controls and can be turned on or off for each individual 2D view as desired.
Starting point marker:  At the beginning of each drag a blue target marker is created to designate that position in the 2D dragging view. Because a poly can not be constructed with less than three faces, objects will not be drawn until, holding down the LMB, the cursor has moved at least three vertical scale grid sections away from this target position and either to the left or right of it. For every grid unit the cursor moves away vertically (up or down) from this target an additional section of faces, and in some cases an additional section, will be added to the object. When the cursor is moved horizontally (left or right) from the target the object will increase in size. The reverse also holds true. To keep from creating an object, to change its distortion settings or cancel its creation, simple move within the 'no draw' zone and release the mouse button.
Segment\Face indicator:  As a drag takes place a green label and cross hairs are also displayed and updated to indicate the number of segments (sections) in some cases and faces. As the amounts increase and decrease, the label will change color from green to fuchsia to purple to red indicating a possible program performance slowdown and excessive faces for game use. In the case of the Sphere object, any amount over fifteen faces, in the purple to red range, will cause a program slowdown and possible temporary freezing. However, it will return to finish the object if so desired. Otherwise, just move the cursor back below the purple zone and continue when it returns active.

Misc. Info:
A couple of brief extra points on the use of the QuArK Quick Object Makers are given here, below.
Special vertex dragging :
As mentioned earlier in the 'Pyramid\Cone' section above, movement of an objects vertex using the standard method may cause unwanted distortion. If so, try using the special vertex dragging function as described in the 'Pyramid\Cone' section.
Grid Scale effects :
Changing the Grid Scale settings will have a direct effect on both the size of the objects and the scale of their texture, which is always the Game Configuration Default texture.
Make Hollow & Other tools :
Even though the automatic hollow function is available for use, as covered in the 'Dialog boxes' section above, you still have the option to use both the Extrude walls and Make hollow tools on a solid object. It is recommended that these tools be used with a low Movement Configuration setting for the Inflate/Deflate amount. Even though the inside shape will be accessible for players and other models, interior walls may still exist. These will need to be removed manually. It is also recommended that you use a negative amount to cause it to build inward thus to help eliminate holes or leaks in the finished product. Even doing so may sometimes still leave gaps of the outer walls, thus causing a leak. In which case it will become necessary to either repair these leaks manually, place another poly over the leaks to close them or place a large hollow box around the entire map area to allow proper building of the map. Another good idea is to check for Broken polys and faces afterwards depending on how they will be used in the map.
One other, and perhaps more consistently successful way, would be to use a negative poly to create a large opening or doorway and leaving the interior walls intact for the most part. But as all good things, this will take a little bit of experimentation and imagination to become proficient at.
A word of caution : Curved shaped objects use the Extrude walls method automatically to make them hollow. This can leave visible separations between their outer faces. Using the Make hollow function manually can take an extremely long period of time, well over an hour for the sphere with twenty or more faces, because of the large number of faces that they can consist of for a single poly. During this processing time QuArK will freeze up and appear to be non-responsive. However, it will return active once the hollow object is completed.
A Recommended Solution : to the above situation would be to create the solid object first, to ensure its proper size and location for its map use. Open another session of QuArK, copy the solid object to the new session and allow the hollowing function to take place there while you continue your work in the original session. Then copy the completed hollow object back into the map for final placement and deletion of the original solid object.
You can determine which method an object has been made hollow with by either looking closely at its outer faces where they join or by looking on the Edit menus Undo / Redo... window where the method used will be shown just above the object listing. Clicking on the method listed will return the object to its solid state, in its current position, without having to remake it.


Copyright (c) 2022, GNU General Public License by The QuArK (Quake Army Knife) Community - https://quark.sourceforge.io/

 [ Prev - Top - Next ]