
Menubar
Updated 05 Apr 2018
- QuArK Information Base
- 1. Introduction to QuArK
- 1.5. Model-editor in QuArK
|
|
Menubar
Updated 05 Apr 2018
|
Upper levels: - QuArK Information Base - 1. Introduction to QuArK - 1.5. Model-editor in QuArK |
|
1.5.4. Menubar |
[ - - ] |
New commands are constantly being added to the all menus. If there is no F1 help for some command, or you can not understand what it says, post to the QuArK messageboard for help (and a heads-up to the docco writers). Most of the commands on the menus also have hot keys (accelerators), which you can customize from Configuration at the bottom of the 'Options menu'. |
|
Index |
|
File menu |
cdunde - 05 Apr 2018 | [ Top ] |
|
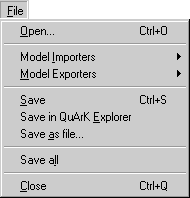
Model Importers Shows the Python importer plugins that are available. They will import that type of model once the editor is open. Model Exporters Shows the Python exporters plugins that are available. They will export that type of model once the editor is open. Save will save your current model to the same location and file type it was opened as. Save in QuArK Explorer . Use this if you want to add this model to your current project. This way, you can have multiple revisions of a model, in a single project. Just remember to give them a sensible name, so you can distinguish them. The model editor will automatically close itself when you use this menuitem. Save as file . If you want to export this model as a different supported model format type, select this menu item. A QuArK .qkl model work file can be created using this function. Even though, at the present time, QuArK can only save Quake 1 .mdl and Quake 2 .md2 files, it can save Quake 3 .md3 files as a QuArK .qkl model work file. This format preserves all settings and Components of the model making it much easer when you start a new session of the QuArK Model Editor. to resume your work. Save all will save all opened files. This includes the current project and modified add-on data files. Close will close the model editor. |
|
Layout menu |
cdunde - 05 Apr 2018 | [ Top ] |
|
Solid will change all model-views to show the model as a solid object. This means that you won't be able to 'see-through' the model once it's in view. Textured will change all model-views to show the model with it's applied textures and alignment. 3D view will create a new free-floating 3D edit window. You can actually edit the model in the 3D view and manipulate its 'mesh' (frame shape). This view, and all the others, can use the OpenGL standard 3D graphic library. (Silicon Graphics' OpenGL drivers for Windows: http://www.berkelium.com/OpenGL/sgi-opengl.html.) Show whole level will in wireframe-mode, draw all lines the model consists of, even those that can't be seen simultaneously in all model-views. Gray out of view will in wireframe-mode, draw grey lines of those parts of the model, which can't be seen within the model-views. Hide out of view will in wireframe-mode, only draw lines for those parts of the model, which is within the model-views. Panel at right . Check this menu-item, if you want the compass, dataform and that area, moved to the right of the model-views. Layouts . These menu-item are used to change between the different model-layouts. |
|
Edit menu |
cdunde - 05 Apr 2018 | [ Top ] |
|
Undo/Redo will open up the Undo/Redo window, where you can undo or redo more actions with one mouse-click. Duplicate . A copy and paste action, but without putting the selection in the clipboard. Cut . You know; remove the selection and put it into the clipboard. Copy . Just as easy; copy the selection into the clipboard. Paste . Take whatever is in the clipboard, and if it is something QuArK can use, it will paste it to where you point. Delete . Deletes the selection. Notice that it won't put anything in the clipboard. |
|
Toolboxes menu |
cdunde - 05 Apr 2018 | [ Top ] |
|
|
|
Search menu |
Decker - 05 Apr 2018 | [ Top ] |
|
Find Faces . This function selects the faces entered for the component currently selected or selected from the drop down box. Place a comma between each face entered to find more then one. Find Skin Vertices . This function selects the Skin-view vertexes entered for the component currently selected or selected from the drop down box. Place a comma between each face entered to find more then one. Find Skin Faces . This function selects the Skin-view face vertexes for the faces entered of the component currently selected or selected from the drop down box. Place a comma between each face entered to find more then one. Find Objects This function will search for objects by their 'type' (the type of model object it represents, a bone, skin, frame...). Find Camera Positions This finds all the camera positions. Editor next shot . This selects and sets the next camera shot for the Editor's 3D view in the group. Cycling - Depress (default) 'F3' to switch to the next view. Editor prev shot . Selects and sets the previous camera shot for the Editor's 3D view in the group. Cycling - Depress (default) 'F4' to switch to the previous. Editor 3D shot . This creates a camera shot of the current editor's 3D view in either standard or 'True 3D' mode. Depressing the Hotkey (default) 'F5' will do the same thing. Full 3D shot . This creates a camera shot of the current Full 3D view in either standard or 'True 3D' mode. Depressing the Hotkey (default) 'F6' will do the same thing. Full 3D next shot . This selects and sets the next camera shot for the floating 3D Window in the group. Cycling - Depress (default) 'F7' to switch to the next view. Full 3D prev shot . Selects and sets the previous camera shot for the floating 3D Window in the group. Cycling - Depress (default) 'F8' to switch to the previous. |
|
Commands menu |
cdunde - 05 Apr 2018 | [ Top ] |
|
Duplicate Current Frame : This copies a single frame that is currently selected and adds that copy to that model component's animation frames list. For multiple frame copies use the 'Duplicate' function on the 'Edit' menu. Match Frame Count : This will duplicate the number of frames in the selected components with the one that has the most frames in it. It will not copy the frames, only how many there are. Check Components : This checks components for any errors in them that might exist. Auto Assemble : Some models are made up of seperate model files for example .md3 files. This function attempts to auto-load those related models model files and attach them using what is known as tags to match them up correctly. X Y Z Axis locks : All three of these items work in the same manor but are independent from one another. They restrict any vertex movement in their related direction for all views and are interactive with their corrisponding buttons on the View Selection tool-palette. All of these commands are dupelicated as a sub-menu of the Editor Views RMB menus. |
|
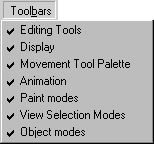
Toolbars menu |
cdunde - 05 Apr 2018 | [ Top ] |
|
Editing Tools . Wether or not the Editing Tools toolbar should be visible. Display . Wether or not the Display toolbar should be visible. Movement Tool Palette . Whether or not the Movement toolbar should be visible. Animation . Wether or not the Animation toolbar should be visible. Paint modes . Wether or not the Paint modes toolbar should be visible. View Selection Modes . Whether or not the View Selection Modes toolbar should be visible. Object modes . Wether or not the Object modes toolbar should be visible. |
|
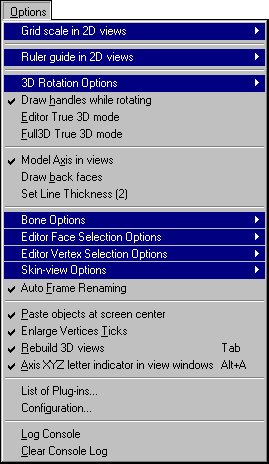
Options menu |
cdunde - 05 Apr 2018 | [ Top ] |
|
Ruler guide in 2D views : See detailed sub-menu and description below. 3D Rotation Options : See detailed sub-menu and description below. Draw handles while rotating : This allows the models vertex handles (if active) to be drawn during rotation, but this will slow down the redrawing process and can make rotation seem jerky. Editor True 3D mode : This causes the Model Editor's 3D view to operate the same as the Map Editor when maneuvering and also allows passing through a component. This is very useful when working on scenes to see ' into ' the model and work on other components within it. Full3D True 3D mode : This causes the FIRST Full 3D view opened only, to operate the same as the Map Editor when maneuvering and also allows passing through a component. This is very useful when working on scenes to see ' into ' the model and work on other components within it. All other floating Full 3D views will operate as usual. If the first is closed and the next uses this option the last camera position of the first one will still be in effect. Model Axis in views : This displays the models axis on which it was built in all views, showing its X, Y and Z direction. The size of its letter indicators and line thickness can be increased or decreased by using the 'Set Line Thickness' function, a little further down. Their individual colors can be changedin the Colors Options settings. Draw back faces : This allows the back face checkerboard pattern to be drawn in all view modes when the 'Views Options', 'Mesh in Frames' of the Views Options is checked for that view. Using the option in this manner will help to distinguish which direction the faces are facing for proper construction. Set Line Thickness : This lets you set the thickness of certain lines that are drawn on the Editor's views, such as the outlining of selected model mesh faces and the models axis lines. Bone Options : See detailed sub-menu and description below. Editor Face Selection Options : See detailed sub-menu and description below. Editor Vertex Selection Options : See detailed sub-menu and description below. Skin-view Options : See detailed sub-menu and description below. Auto Frame Renaming : Some models consist of more then one component. If so, their frame names should always match. When checked, if a frame of one component is renamed, this will cause the same frame of all the other related components to be renamed also automatically. Paste objects at screen center : Check this if you want objects that you paste into the editor's views to appear in the center of the current editor's view. Uncheck it, and it will paste it at the exact position as the original. Enlarge Vertices Ticks : This makes the model's ticks 1 size larger for easer viewing. Rebuild 3D views : This rebuilds the 3D views (actually all views) in the Model Editor in case of a lockup. You may have to do this a few times to clear the views up. The easiest way is to just push the HotKey until the views unlock and clear up. Axis XYZ letter indicator in view windows : This display s the X Y or Z indicator letter per view to associate the rotation menu buttons. These are for reference only and are not selectable with the mouse. List of Plug-ins &: Opens a window which shows what plug-ins QuArK has loaded. Configuration : Takes you to the 'Configuration and Options'. Log Console : When active this will write everything that is printed to the console to a text file called 'Console.txt' which is located in QuArK's main folder. Clear Console Log : When clicked this will clear everything that is printed to the text file called 'Console.txt' which is located in QuArK's main folder.
|
|
Help menu |
cdunde - 05 Apr 2018 | [ Top ] |
|
Help contents . Opens your web-browser. QurK's Layout . Opens your web-browser to the basic editor layout page of these docs. FAQ . Opens your web-browser to the FAQ page of these docs. QuArK's web site . Opens your web-browser to the on-line Official QuArK web site. QuArK's Forums site . Opens your web-browser to the on-line QuArK Forums site. Check for updates . Checks on-line for QuArK program updates. View console . Shows a Python-console. Usefull when debugging plug-ins. About . Shows the about box. |
|
Copyright (c) 2022, GNU General Public License by The QuArK (Quake Army Knife) Community - https://quark.sourceforge.io/ |
[ - Top - ] |

 Open works just as in the QuArK-Explorer. You can open any supported model file with
this to work on.
Open works just as in the QuArK-Explorer. You can open any supported model file with
this to work on.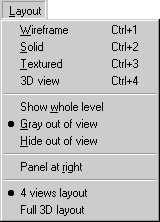 Wireframe will change all model-views to show the model as
wireframe-graphics. This is the fastest drawing-method of the model-views.
Wireframe will change all model-views to show the model as
wireframe-graphics. This is the fastest drawing-method of the model-views.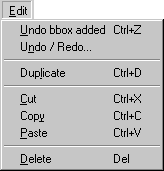 Undo [something] . This menuitem will be active, if you can undo a
previous action. The something , will be the action it will undo.
Undo [something] . This menuitem will be active, if you can undo a
previous action. The something , will be the action it will undo.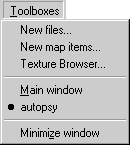 This menu works just like the one in QuArK Explorer.
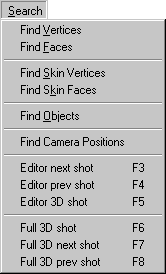 Find Vertices . This function selects the vertices entered for the component currently selected
or selected from the drop down box. Place a comma between each vertex entered to find more then one.
Find Vertices . This function selects the vertices entered for the component currently selected
or selected from the drop down box. Place a comma between each vertex entered to find more then one.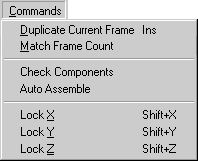
 Grid scale in 2D views : See detailed
  These functions allow you to display a scale and tick mark guides
of the current grid setting in any one, combination, or all of the 2D views of the Editor, as
shown in the top sub-menu. You can also center any one or combination of the scales for
each view. If ' All 2D views ' or ' all scales centered ' is checked, it will deactivate this
menu's individual items.
These functions allow you to display a scale and tick mark guides
of the current grid setting in any one, combination, or all of the 2D views of the Editor, as
shown in the top sub-menu. You can also center any one or combination of the scales for
each view. If ' All 2D views ' or ' all scales centered ' is checked, it will deactivate this
menu's individual items. These functions allow you to display a line with the unit distance
of total selected items in any one, combination, or all of the 2D views of the Editor. Much like
the 'Grid scale in 2D views' function above, this feature also has its own list of selections,
as shown in the far right sub-menu. If one of these sub-menu items is active, checked, then when ever a single
These functions allow you to display a line with the unit distance
of total selected items in any one, combination, or all of the 2D views of the Editor. Much like
the 'Grid scale in 2D views' function above, this feature also has its own list of selections,
as shown in the far right sub-menu. If one of these sub-menu items is active, checked, then when ever a single
 Original 3Dview rotation : This is the way QuArK's model rotation has worked in the past.
As long as the model drag is started flat (z at 0) it rotates and tilts during rotation fine.
But if it does a hiccup during the drag with the model tilted that is when it starts to drift
off center and possibly out of the view eventually. The model can be placed anywhere in the view and
rotated from that location.
Original 3Dview rotation : This is the way QuArK's model rotation has worked in the past.
As long as the model drag is started flat (z at 0) it rotates and tilts during rotation fine.
But if it does a hiccup during the drag with the model tilted that is when it starts to drift
off center and possibly out of the view eventually. The model can be placed anywhere in the view and
rotated from that location. Match Bone Lines Color : This function is also located on the
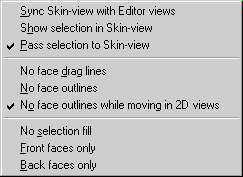 Sync Skin-view with Editor views : This function is also located on the
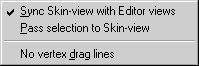 Sync Skin-view with Editor views : This function is also located on the
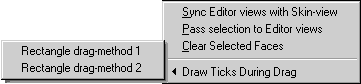 Sync Editor views with Skin-view : This function is also located on the
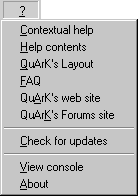 Contextual help . Opens your web-browser.