|
This section covers the Texture Applicator or "paint brush" and its related Dialog Input functions. It does everything that the Basic Selector does when you are in the 2D views of the editor. However, in the textured 3D views it works entirely different. Much like on the Face-view page, all of its input is Live Edit, meaning these take effect, and reflect, so as soon as you enter them.
|

|
The Texture Applicator can also use the Basic Selector's Dialog Input, but that can only be brought up by selecting the Basic Selector, clicking the Selector Dialog Input button and then switching back to the Texture Applicator.
Like the Basic Selector, the Texture Applicator's dialog will appear when you click on the Selector Dialog Input button while in this selector mode.
This particular dialog is a combo input box that it shares with the Touch-up Selector.
The first input box of the dialog, Texture, is for the selection of the texture that is currently being used. Meaning it will apply the texture that is displayed within the input window. There are two ways you can use this and works the same for all of the other input boxes.
|

|
You can select the texture by clicking the ". . ." input button to bring up the Texture Browser and pick one from there, or select any face of any poly in the map, click the Selector Dialog Input button and that face's texture and all other data will be entered for you automatically, unless the Retain check box is active. Then only the Origin values will remain unchanged.
The Origin, or second input box, can be made manually in the input box area or changed by clicking on the 4-way button next to it. This takes two values for the X and Y positions of the texture and will move it left and right or up and down on the face, decimals can be used.
The third input box, as mentioned above, will Retain the origin that is currently displayed. When this is active, or checked, the texture will use these amounts as a fixed point and give a smooth continuous appearance. If unchecked each face's origin will be used and give a chopped up look to the surface as a whole.
The Scale size input will stretch or shrink the texture's width or height and is used a lot to get a wood grain or distorted appearance to change the overall look. As a percentage factor of the texture size, the default values are 100 100.
Angles will rotate, or tilt, the texture on the face and again takes two amounts for the X and Y axis, in that order.
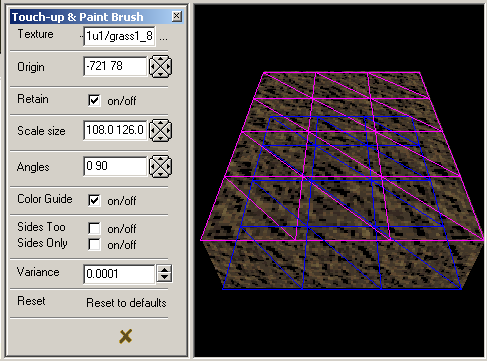
Color Guide, when active or checked, will display the colored face shapes as shown above by simply moving your cursor over a particular terrain surface area. These do not apply any texturing, but are used as a guide to go by. The Fuchsia color shows the up faces and the Dark Blue shows the down faces. These are only temporary and can be cleared, or removed, from the view by holding down the RMB for a second or doing a slight movement of the view. They will only appear on movable terrain faces to distinguish them from regular faces.
Sides Too and Sides Only actually toggle each other, meaning you can only use on at a time and one will turn off the other automatically. Sides Too will allow you to apply texture to the side faces as you apply it to the top and/or bottom faces. Sides Only will only allow texture to be applied to the side terrain faces for situations where they are exposed to the scene. Such as cliff sides.
Variance does not apply to the Texture Applicator. This is used by the Touch-up Selector and is covered in that section.
Clicking the Reset to default button is a quick way to reset the Scale size and Angles to their default values and bringing the texture back to its normal appearance. For example, if the two Scale size values where set to say 1 1 then you would only see a solid color because it is redrawing the texture to only one percent of its actual size making it extremely small and un-displayable. Reset will also restore all of the other default values, from, and including, the Retain setting on down.
This particular dialog can also be used for poisoning the texture on any face in a map to align your textures. It will remain open and on top of the editor until you close it with the "X" button. Also, it can be moved to any location and stretched to any size.
|

|
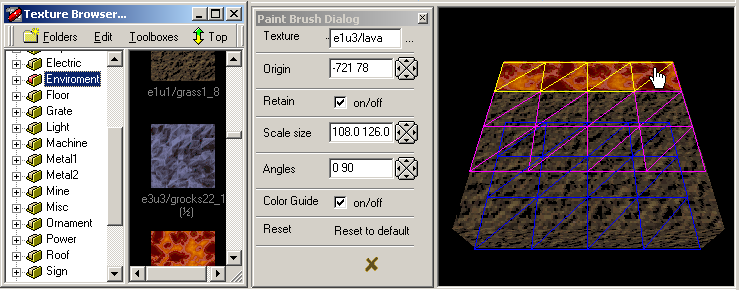
Actually applying the texture is very simple. Just hold down the LMB and pass over the areas you wish to change. As shown above, the faces receiving the new texture will turn Yellow, which will disappear when the movement has paused or the LMB is released and the new texturing will appear. Sometimes the 3D view will not refresh properly and you may need to press the Tab Hotkey a couple of times to get it to do so. Unfortunately, this is a problem that has existed in QuArK for some time.
|
|