Go to QuArK Web Site
Menus and Toolbar-icons
Updated 03 Mar 2019
Upper levels:
QuArK Information Base
1. Introduction to QuArK
1.7. Terrain Generator in QuAr...

 1.7.2. Menus and Toolbar-icons

 [ Prev - Up - Next ] 

Please enable JavaScript to get the most out of this page

Move your mouse over the toolbar to highlight an area
for its function(s) description that will appear shortly
then click that area to go to its information section.

Terrain Shape Builders Import Converter Face Converters Adjacent Faces Selector Basic Selector & Dialog Box Touch-up Selector & Dialog Box Texture Applicator & Dialog Box 3D views Options Dialog Box

 Index


 Terrain Shape Builders

cdunde - 05 Apr 2018   [ Top ] 
The first three buttons of the toolbar are the 'Terrain Shape Builders' buttons that are used to select witch pattern of terrain grid is to be used. Each button shows a simulation of what that particular pattern looks like for easy selection.
These shape builders can also be obtained from various other menus in QuArK. One way is through the Shape Builders menu using the New Polyhedrons icon as shown below on the left and also by selecting the Toolboxes item on the main editor menu then New map items... as shown on the right.
They can also be created from a single square or rectangle poly by first selecting the poly and then clicking your RMB to get the appropriate pop-up menu where these functions can be selected. This feature constructs a starting size of your own.
For further detailed information on their features, usage and settings see the section entitled 'Terrain Shape Builders'.

 Import Converter

cdunde - 05 Apr 2018   [ Top ] 
The fourth button of the toolbar is the 'Import Conversion' button. This provides a function to convert imported terrains, that have been created in other terrain editors, into the proper format so that they too can be edited within QuArK in the same manner as its own.
Once a terrain has been imported, by means of using QuArK's Addons menu function, then all or any selected part of that terrain can be converted to the proper format, for further editing, by simply clicking on this button.
This feature has been designed around two specific and widely used terrain editors GenSurf Terrain Maker and
Nem's Tools-Terrain Generator.
And all though other terrain editors are not supported directly as these are, it is hopeful that it will serve them as well.
Upon the completion of a conversion, a brief report message will be displayed to give you details on its success, any items that may not have been converted and why. There is also an alert feature built in for any improper poly detection that will cancel this function and select that particular poly for you so that corrective measures can be taken to alleviate the problem.

 Face Converters

cdunde - 05 Apr 2018   [ Top ] 
These three buttons of the toolbar are the Face Conversion buttons. This is a very unique feature of the QuArK Terrain Generator that allows you to shape your terrain from the top (up faces), bottom (down faces) or both at the same time by simultaneous movement moving in the same direction at the same time.
Once again the buttons are designed for easy recognition as to exactly what each one of them does. This is demonstrated in the side view screen shots below where the selected faces are highlighted in red with the movement handle centered on the group selected.
And their corresponding 3D Textured views dramatize this even further. The first denotes standard surface treatment for a hill or mountain, the second could be textured to represent stalactites hanging inside of a cave and the third puts both of those elements together to create that mountain and cave. By isolating your down face selections in various locations and pulling them downward, you would then create those stalactites throughout your cave.
By using both sides of your terrain sections in this manner, you can create some dazzling effects while keeping your poly count to an absolute minimum, which is a very important element of any game mapping. And, by using different sections of terrain of different grid sizes, smaller ones for nice detail work and larger ones for general coverage, this will assist you even further to maximize your surrounding effects while still remain efficient in your map creations.

 Adjacent Faces Selector

cdunde - 05 Apr 2018   [ Top ] 
Another very nice tool is the Adjacent Faces Selector button. The function that it provides is that of selecting one particular face, either up , down or both, and then ,by clicking this button, having all of the adjoining faces that it touches added to your selection automatically.
This can create some very nice random and staggered effects to your terrain as illustrated below. Here, using just a slight amount of drag, we have created a rugged effect. Then by merely adding some grass and twig texturing to the flat area and fair size boulder texture to the random area, we have just given our surroundings a nice look with very little effort. Thank you Rowdy!

 Basic Selector & Dialog Box

cdunde - 05 Apr 2018   [ Top ] 
Our next two buttons on the Terrain modes toolbar are really two functions acting as one for the time being. The first one is the Selector Dialog Input button and the second is the button which uses the first one, our Basic Selector.
The Basic Selector is the one we have been using through out these demonstrations. So you should be fairly familiar with its operation by now. The Selector Dialog Input function however, is a whole other matter that's adds real punch to the Basic Selector's functionality and capabilities.
Once a selection has been made, using the Basic Selector, the Selector Dialog Input button becomes active, or usable for that particular function button, and by clicking it, will now open the dialog box. As you have probably figured out by now, these are adjusters that can be applied to the Basic Selector to cause it to render different shapes to the dragging process. And because they are virtually unlimited, so are the possibilities that it can give.
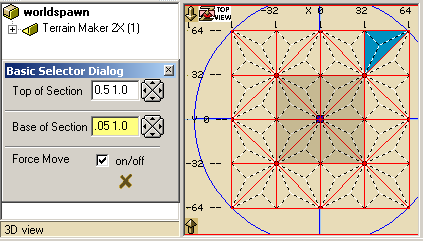
The very first time the Dialog Box is used its default values will be preset and show in the two input areas. These values are also shown in the 'hint pop-up box' of the Basic Selector's button and can be viewed by holding your mouse cursor over that button for a second. As a general note, sense they work together, if one value is set to zero then the other will have no effect.
The first input box of the dialog, in this case, effects the very top of the selection, which means where one point of each face meets the center handle when looking at it in the Top View of the editor, and is shown slightly darker in the screen shot above.
The second input box will deal with the rest of the selection in the same manner. Each input box takes two individual values. The first value represents a percentage factor that will be applied to the second value, which is the amount of units that will be added to the Basic Selector's movement during a particular drag. Meaning, that you can start a drag, pause, set a different set of values and then continue the drag once again. Or, you can do the same process but this time make a new selection of an area and apply the new settings just to those faces. So as you can see now, the possibilities are virtually unlimited !
The third check box is an entirely different setting. This function is used for special situations when faces will not move as sometimes occurs with Imported Terrains or you wish to move faces that normally would not move. When this tool is activated the above adjusters will also influence its movement and it too is an item you can use on the fly like the ones above. When using this feature on the down faces set one of the two entered amounts as a negative because you are working in a revered direction. A little experimentation will help a lot.
To make things easer while using the Dialog Box it has its own built in features. It will remain open and stay focused on top of the editor until you decide to close it so changes can be made on the fly. It can also be resized like any other window and moved to any location of your choosing by simply putting your mouse cursor over the blue title area at the top, and while holding down your LMB drag it to its new location.
One final feature is that once the dialog box settings are changed they are stored and saved to keep them the same until you change them again in another session of QuArK. Also, it can remain either open or closed during the dragging process and its settings will still take effect.
The reason I said it ''becomes active, or usable for that particular function button'' earlier is because as new selectors, or even tools, are added for QuArK's Terrain Generator they too can have their own dialog input boxes to further enhance the features that they will provide as well.
A few items that need to be covered about the Basic Selector are these. Like the QuArK's Standard Selectors, it can select individually other types of items like the 'Terrain Shape Builders' , it can also drag them or their side handles in the editor's views. But it can not select a group of other standard items such as regular polys and entities using the drag selection method. To do this you will need to use one of the QuArK Standard Selectors. On the other hand, it can do things that the standard selectors can not do. The most important being the ability to select terrain surface right through every thing else, like other polys and entities. This means that you do not need to hide, move or work around these other items. That was the whole bases of why QuArK's Terrain Generator was developed. The ability to create and edit terrain around all other mapping items while they are being displayed in the editor.
The selection process itself is also different for a very specific reason. Where the QuArK Standard Selectors will select any poly that it touches, the Basic Selector will not. Instead, it only selects a face if the center point of that face is within the selector's red rectangular selection box. It was designed this way so that odd and ill regular selections could be made.
Another nice feature of the Basic Selector is its ability to select only surface faces to aid in the process of texturing the terrain. More on the subject of using the Basic Selector for texturing techniques is covered on the 'Texture' page.

 Touch-up Selector & Dialog Box

cdunde - 05 Apr 2018   [ Top ] 
For more detailed work there is the Touch-up Selector. It does everything that the Basic Selector described above does when you are in the 2D views of the editor. However, in the textured 3D views it works entirely different.
The Touch-up Selector uses a combination dialog input box called the Touch-up & Paint Brush dialog. This can be brought up by clicking the Selector Dialog Input button when you are using this selector. The item on this combo dialog that pertains to this selector is the Variance input function.
Because sometimes imported terrains, or even ones originated in QuArK, can go off from other faces that make up that area of terrain surface, the Variance function gives you the ability to still move close grouped faces by increasing the amount of distance between their vertexes that is acceptable to be included in that common group. The default value is preset to a very close amount but any amount can be used as you see fit.

Another nice feature is the Color Guide that helps you to identify the common faces that make up a surface group that you are working with. This color guide uses the same color scheme as the Basic Selector but adds additional colors for specific reasons. Such as the yellow outline of the primary face with a dark blue drag handle of its vertex that will be moved along with its common (adjoining) faces. The Color Guide on this dialog box also works in conjunction with the Color Guides on the 3D views Options Dialog Box to give a wider variation as to how they will be displayed in any of QuArK's 3D views.
Because this section is just a summery to get you acquainted with the different toolbar buttons, not all of its features will be covered here. So it is highly recommended that you read further about it in the Touch-up Selector section.

 Texture Applicator & Dialog Box

cdunde - 05 Apr 2018   [ Top ] 
This button is the Texture Applicator or "paint brush". It also does everything that the Basic Selector does when you are working in the 2D views of the editor. But, when in the textured 3D views its job is to apply your textures.
The Texture Applicator can also use the Basic Selector's Dialog Input for dragging in the 2D views, but that can only be brought up by selecting the Basic Selector, clicking the Selector Dialog Input button and then switching back to the Texture Applicator.
Unlike the Basic Selector, the Texture Applicator also has its own functions, but uses a combo Selector Dialog Input with the Touch-up Selector and which will appear when you click on the Selector Dialog Input button while in this selector mode.
Because of the Texture Applicator's wide range of ability and the numerous functions of its Dialog Input we will only give a very brief description of its basic function here, that being able to retexture terrain surface faces on a more detail and controlled basis.

For complete detail of its applications and uses please go to the Texture Applicator & Dialog Box section of the Texture page.

 3D views Options Dialog Box

cdunde - 05 Apr 2018   [ Top ] 
The last button on the toolbar is the 3D views Options which opens its own Dialog Box and is laid out in the same order as the Display tool-palette.
This dialog give you the ability to customize every 3D view that QuArK provides and does so independently from one 3D view to the next.
All of the Floating 3D window titles have also been updated to correspond to the titles on this dialog to make it easy to identify them as you make your view selections. Each has its own grouped settings.
The 3D views Options dialog was placed on the Terrain modes toolbar because it primarily deals with those items.
However, the first selection, No icons, of each 3D view group does also apply to the other standard QuArK Selectors and will remain in effect when they are being used. The dialog will remain open until manually closed, it is movable, resizable and will save its settings.
No icons refers to the camera eye icon and its handle that you see when positioning a 3D view.
Drag is the displaying of the blue selection circle and center drag handle.
Red faces are the selected, movable terrain surface faces that show their locations.
Color Guide are the color outlining of the faces before apply new texture and other actions. These also works in conjunction with the Texture Applicator dialog Color Guide to add even more effects to their settings and can be quite effective when needed.

As a general note, you will never see the blue movement ring, as shown in the above left hand views, when you are in the Touch-up Selector mode because it uses its own movement handle configuration.
For more screen shots and information on the Color Guide settings and variations see the Touch-up Selector section.


Copyright (c) 2022, GNU General Public License by The QuArK (Quake Army Knife) Community - https://quark.sourceforge.io/

 [ Prev - Top - Next ]